
Alright, I’ve been working on this post for a few weeks now and decided to just publish it—even though the dollhouse isn’t completely finished. Since there are so many steps to my dollhouse project, I am breaking them up into smaller posts. This first post shares the DIY modern wooden dollhouse build plans for you guys. So, just the structure of the dollhouse. In future posts, I’ll chat about customizing the dollhouse. I’m going to be finishing off the house by adding wallpaper and baseboards, framing out the doors and windows, adding wall art, and adding siding to the front of the house. And maybe some other smaller details, stay tuned 🙂 For now, the build! (Affiliate links below; read more about those here)
Always take the proper precautions and safety measures before working with any tools or materials. Wear safety equipment and work with a professional to complete projects when necessary. Read my full terms of use and disclosure for more. Happy making and stay safe!
For the full cut list and pocket hole placement guide, you can download the free printable DIY modern dollhouse plans at the link below. Just drop your email in, and then you’ll get an immediate email with the plans for instant download. (You’ll also be able to check out all of my other free woodworking plans and download any others that interest you!)
If you’ve never used pocket holes before, also make sure to check out my ultimate guide for using the KregJig K4. It’s an awesome and very handy woodworking tool—one of my favorites!
Here is a link to the Dropbox folder with all of the files!

First I added the side pieces using the pocket holes and pocket hole screws. I made these flush with the back of the base piece and decided to have the pocket holes facing in so they would be easier to cover up with “wallpaper.”


Then I added in the second floor. First I cut a little rectangle out to be the stairway’s entry to the second floor. The jigsaw was great for this. Then I attached it to the side pieces using the pocket holes and pocket hole screws.


Because the roofline is slanted, there is only one main second-floor wall, and that’s the piece with the door in it. I attached this using the pocket holes as well. It was starting to look like a dollhouse! (Ignore the divider piece on the bottom in the first pic below—that was just there to help me visualize things.)
At this point I also started to do a little painting just to speed things up, but you can obviously finish your house however you want or wait until the end to paint. I also started patching some of the pocket holes here so they’d have a bit of time to try and re-coat if I needed to.


I was cutting as I went and testing the roof angle with each cut. Here’s a picture of me setting the roof on top to make sure everything looked like I wanted it to. I hadn’t attached the roof yet. But I was happy with it, so I went ahead and added all of the dividers.
I did two vertical dividers—one for the bottom and one for the top floor. Then I added a little horizontal “loft” divider just for a bit of extra room space. The doll furniture set I got had 5 rooms, so I wanted a 5th! I attached these all using wood glue and nails.


I went ahead and painted the roof piece—I figured it’d be much easier to do it before I attached it to the house. I just used one coat of black acrylic paint and a few coats of matte water-based polyurethane for extra protection and a bit of sheen.
This is the only step I needed to bring in reinforcements for. I glued and nailed the roof on, but there was no way that I could hold everything in place and nail at the same time. So I held it in place while Mike ran point on the nail gun. I was so nervous the nails would pop through at a wonky angle because of the angled roof…sooo relieved they didn’t!


I realize this step is a bit out of order, but I cut my backing pieces earlier in the process. Since this step is optional, I figured I’d tack it on at the end of the steps. I picked up two pieces of 12″ x 24″ super thin plywood from the craft store to use for the backing.
Cutting the bottom piece was easy, but the top took a bit more effort. Since things can shift a bit while you’re cutting and building, I recommend tracing the backing, cutting it slightly larger, and then cutting down until you have the perfect fit. I also used painter’s tape to tape the bottom backing piece in place once I had it cut.
I wanted the top backing piece to sit directly on top of it, and I just didn’t have that many hands. Once I’d finished cutting all three backing pieces, I measured and marked where I wanted to cut out a door and three windows with my jigsaw. I wasn’t too worried about the cuts being super perfect because I knew I was going to be covering up the rough edges with trim!


Customizing it is really up to you! I had already done a bit of painting and patching as you can see in these photos. I had also done some tracing for wallpaper before attaching the backing pieces because I thought that would make it much easier.
Once the downstairs wallpaper was up, I was able to add the stairs to the right side of the house. I just attached these using wood glue and nails. These were just pre-made wooden stairs I got on Amazon. They were perfect after I cut off three stairs and painted them black!


I also decided to add a small railing to the deck area off the second floor. Oh—and I used some white brick scrapbook paper to make a patio look, which I’ll talk more about in a separate post about wallpapering and customizing this bad boy.
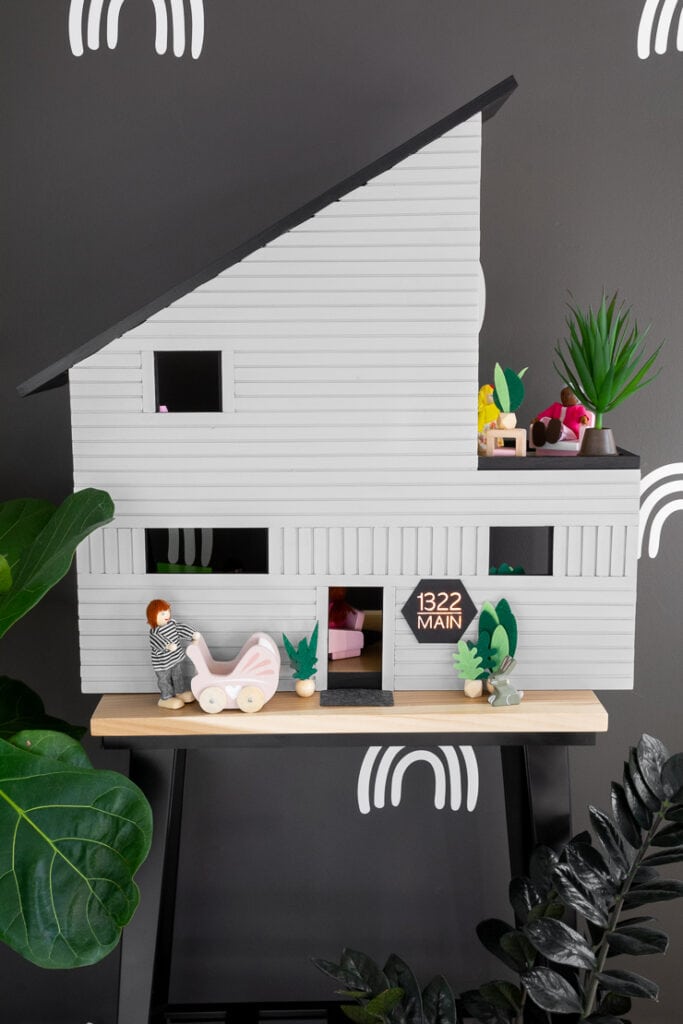
The main structure of the house is finished, and as you can see, I’ve already gotten started on customizing things and cleaning up the rough areas. I’m also planning to paint the backing and make it the “front” of the house, as well as add some siding?
I need to add baseboards and frame out all of the rough edges on the windows. As well as fill some holes, touch up painting, and accessorize. Stay tuned, I’ll be sharing more in a few weeks, and I’ll update this post when I do! (Oh, and the furniture came. It’s this adorable set from Amazon. I can’t wait to get it all set up!)


Reminder, if you want to download the printable PDF plans for this modern dollhouse, including the detailed cut list and lumber shopping list, pop your email in the signup form below. I’ll send you the plans immediately—and you’ll get access to all of my other woodworking plans too 🙂
Here is a link to the Dropbox folder with all of the files!


Posted on Published: October 15, 2020 - Last updated: August 31, 2024